
Automation Rules allow you to automate parts of your shipping workflow by creating “if this, then that” logic.
For example, you can create rules to:
- Automatically select a carrier or service
- Assign packaging based on SKU
- Apply insurance based on order value
- Add or update tags
- Split or box orders based on order details
- Make changes before or after shipping
ReadyShipper X also includes built-in rules that can be shown using the Show built-in rules toggle at the bottom of the Automation Rules window.
To create a new automation rule:
- Go to Automation > Automation Rules.
- Click the + button at the top-left of the Rules panel to create a new rule.
- Use the Enabled toggle to control whether the rule is active. You can leave the rule disabled while building or testing it.
- Enter a descriptive Name for the rule.
- Optionally add a Description explaining what the rule is intended to do.
- If desired, assign a Shortcut key for quick access.
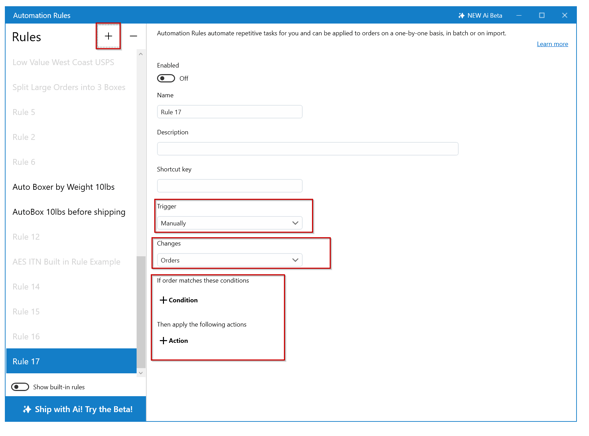
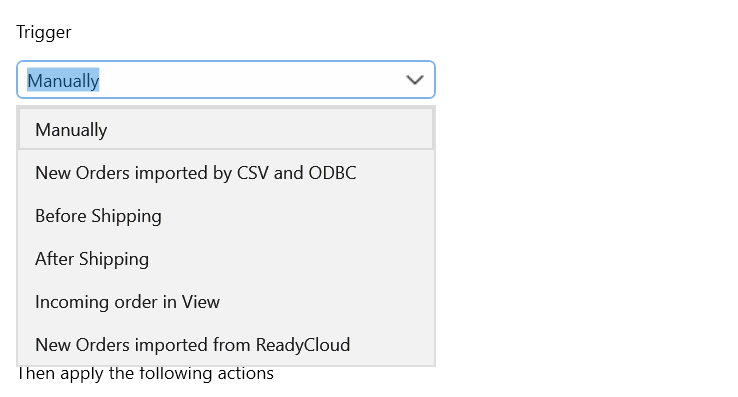
- Under Trigger, choose when the rule should run.
Available triggers include:
- Manually — Run the rule when you manually apply it to an order.
- New Orders imported by CSV and ODBC — Run the rule when new orders are imported through CSV or ODBC.
- Before Shipping — Run the rule after you initiate shipping but before the label is created.
- After Shipping — Run the rule after the shipment has been completed.
- Incoming order in View — Run the rule when an incoming order matches the applicable Order View workflow.
- New Orders imported from ReadyCloud — Run the rule when new orders are imported into ReadyShipper from ReadyCloud. This is typically the trigger to use for ecommerce orders coming through connected stores or marketplaces.
- Under Changes, choose which level of the shipment the rule should affect:
- Orders — applies conditions and actions to the overall order.
- Boxes — applies conditions and actions at the package or box level.
- Line Items — applies conditions and actions to individual items within the order.
- Click + Condition to define when the rule should apply. Conditions are the “if” portion of the rule.
- Add any additional conditions needed for the workflow.
- Click + Action to define what ReadyShipper should change when the conditions are met. Actions are the “then” portion of the rule.
- Add any additional actions needed.
- Enable the rule once you are ready for it to begin running.
Tip: For more complex rules, start with the Manually trigger. This allows you to test the rule on specific orders before allowing it to run automatically.
Note: The available Conditions and Actions will change depending on whether Orders, Boxes, or Line Items is selected under Changes.
Ecommerce Note: If your orders are coming into ReadyShipper through a connected ecommerce store or marketplace via ReadyCloud, use New Orders imported from ReadyCloud when you want the rule to run automatically as those orders are imported.